Introduction
We love open-source applications here at Stack Harbor. That’s why we’re happy to offer Dokku, a very minimal implementation of the Heroku toolchain that’s powered by Docker. Dokku was created by Jeff Lindsay, who’s made it easy for anyone to host their own Heroku-like platform on their own infrastructure. We’ll show you just how to get started with Dokku and Stack Harbor in this guide.
Accessing Your Application
Once your Stack has been built, point your browser to your public IP address. You’ll see a screen that looks similar to the one below:
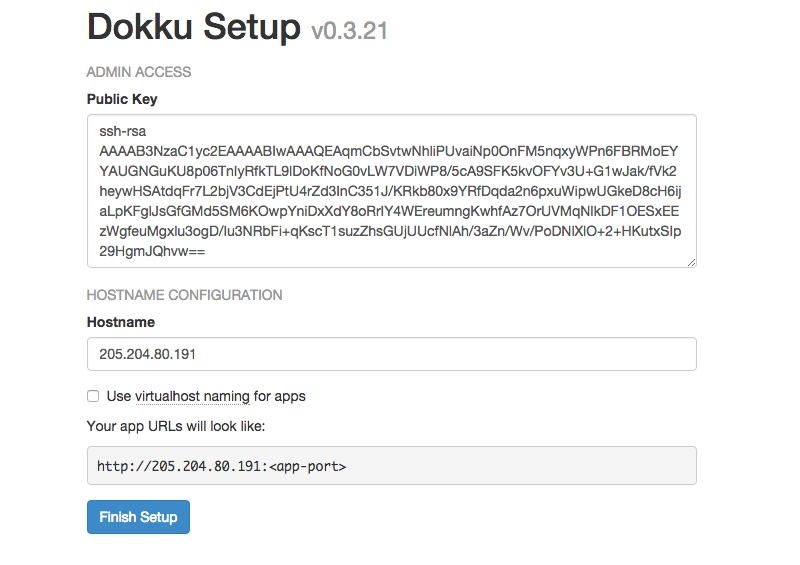
This screen consists of the very minimal configuration you’ll need to perform in order to get started with Dokku on your stack. In the first field you’ll want to enter the public SSH key of the machine on which you’ll be developing and from which you will be pushing code. If you haven’t already generated an SSH key pair for your local machine, check out our tutorial to get set up. If you’re running a Linux or OSX operating system, you can output your SSH public-key by running cat ~/.ssh/id_rsa.pub in your command line and copying & pasting the results in the field. If you have more than one machine you’ll be deploying from, separate each of the public SSH keys by a newline.
In the next field, enter the domain name you’ve pointed at your Dokku Stack. If you haven’t yet purchased and configured your domain name, make sure this remains your public IP address or you will not be able to push code to your Dokku application.
Finally, if you want to access your various applications using different subdomains off of your main domain, make sure to enable “Use virtualhost naming for apps”. Once you’re done, click “Finish Setup” and you’ll be redirected to the first page of documentation for Dokku. Follow the steps on the page if you want to deploy a very simple node.js application to verify that you have a working installation of Dokku.
Deploying An Application
We’ll be going through the steps of deploying a sample node.js application to the Dokku server. Firstly, on your local machine, clone the sample node.js repository and change into the directory by running the following commands:
git clone https://github.com/heroku/node-js-sample
cd node-js-sample
Then, we’ll specify that we would like to add a remote repository to push our local project to. We’ll create a git remote named dokku which lives at the public IP address of our stack.
git remote add dokku dokku@your_ip_address:node-js-app
You should replace the portion of the command that reads ‘your_ip_address’ with the public IP address of your Stack. Run git remote to verify that the remote was successfully added to your list of remote repositories. Finally, to push the application to the Dokku server and deploy it publicly, run the following command:
git push dokku master
This will push the local master branch to the ‘dokku’ remote. At the moment, dokku only supports deployment using the remote master branch. If you want to deploy a different local branch, run:
git push dokku <local branch>:master
replacing local branch with the local branch that you would like to deploy.
Final Words
Congratulations! You have your very own deployment server that you can use to quickly develop and deploy apps into testing environments. Since Dokku relies heavily on git, check out our git tutorials in our Community Section. From all of us at Stack Harbor, ahoy!